Spring MVC App
By ski11up.com
In the previous post on Spring Boot Hello World we have written our first Spring based Java web application. In this post, we will be writing a simple web application using Spring MVC (Model View Controller) which redefines how a web application development is simplified and helps in developing faster with better readability.
App
User (Person) opens the app, enter his/her full name, hits submit, and then he/she will be greeted with a welcome message.
In short, the flow will be like as below:
Person → Enter Details → Greetings (Welcome Message)
Design
In the Spring world all the HTTP requests, are handle by Controller. Views are represented by HTML and Model is the in-transit data (in the form of objects, information from the database, etc.) between the Controller to View or View to View with the help of services.
We need to design a Greeting Controller which will show the form, takes the user full name, and show a welcome message with the user full name.
Below is the design diagram.
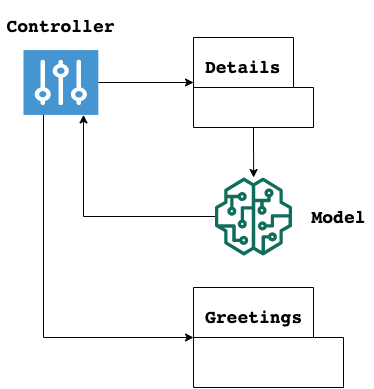
Greetings Controller holds the services, it is serving Details View and Greetings View. Controller initiates the first call where the user fills up the form and then the form data is collected into the Model and then Controller pass it on to the Greetings View.
Model is a simple POJO that contains Person object getters and settings.
Project Setup
We will be using the same project as in the previous post on Spring Boot Hello World, copy the code from Spring Boot Hello World Source Code into a new directory and name it as spring-mvc-demo.
Cleaning up the project, we need to do below.
-
Rename the package to
com.ski11up.spring.mvc.demo -
Rename the
XXXXApptoSpringMVCDemoApp.java -
Remove the
HelloWorld.java -
Rename the
groupIdin thepom.xml -
Remove any other IDE specific files ex.
.idea
You can also create a new project from scratch from Start Spring IO.
Let’s start with the Greeting Controller.
  @Controller
  @RequestMapping("/person") (1)
  public class GreetingController {

    @GetMapping("/details") (2)
    public String getPerson(Model model) { (3)
      model.addAttribute("person", new Person()); (4)
      return "details"; (5)
    }

    @PostMapping("/greetings") (6)
    public String greetings(@ModelAttribute Person person, Model model) { (7)
      model.addAttribute("greetings", person); (8)
      return "message"; (9)
    }
}| 1 | parent API for Greetings Controller |
| 2 | once hit will render the Details View form |
| 3 | details will be stored in a Model |
| 4 | the new instance of Person will be used to store the form values on the model |
| 5 | returns the Details View |
| 6 | once the form is submitted from Details View it will render Greetings View this is the API call on the POST method |
| 7 | Model attribute is passed along with Model to retrieve the values |
| 8 | we are using the Model attribute to store the person Model |
| 9 | returns the Model to the View |
Controller does all the action, first, it renders the Details View with the /person/details service call and the form values are store in the Model which then later retrieved with Model attributes and then Controller present the Model to the Messages View via person/greetings service on submit of the form.
Now we need View to map with the Controller.
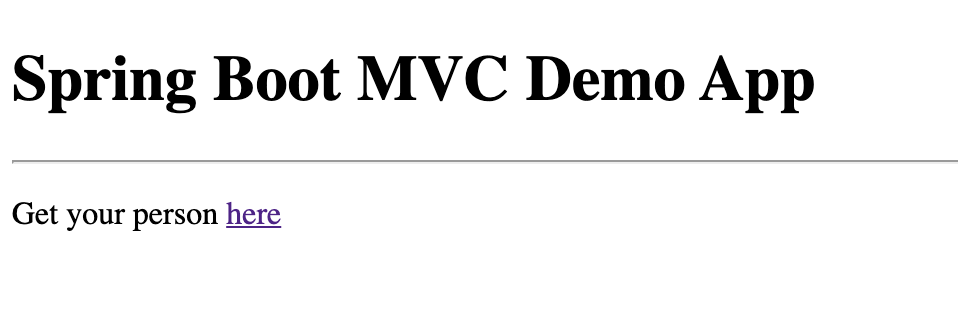
Landing page will be index.html which will be served from /static directory.
.index.html
  <body>
    <h1>Spring Boot MVC Demo App</h1>
    <hr>
    <p>Get your person <a href="/person/details">here</a></p> (1)
</body>| 1 | link to the details view, which is a form for user to enter full name |
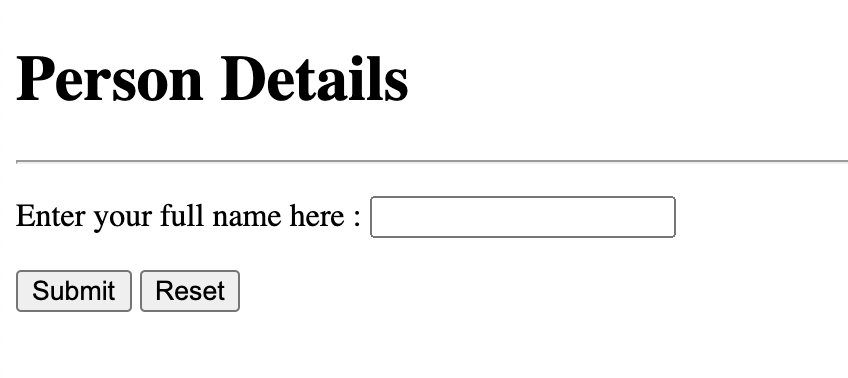
Once the user (Person) clicks on the hyperlink on the landing page he will direct to the form which is our Details View.
  <form action="#" th:action="@{/person/greetings}"
      th:object="${person}" method="post"> (1)
    <p>
      Enter your full name here : <input type="text"
        th:field="*{fullName}" /> (2)
    </p>
    <p>
      <input type="submit" value="Submit" />
      <input type="reset" value="Reset" />
    </p>
</form>| 1 | on submit /person/greetings will be called and the values in the Model will be show in the View, person object is stored in the Model |
| 2 | Person object has attribute fullName, Spring does auto match of the parameters of the Person Bean class |
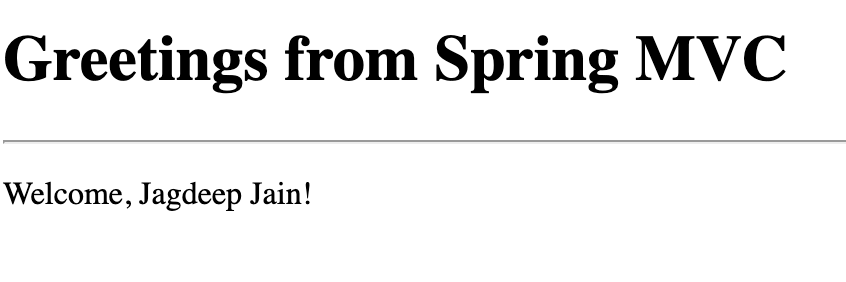
On clicking the submit button the user will be greeted and this is our next view Greetings View.
<p th:text="'Welcome, ' + ${greetings.fullName} + '!'" > (1)| 1 | as shown in the Controller greetings holds the model attributes and hence we are using this to show the dynamic data on the Messages View |
| I am using thymleaf for developing/rending views for this project, by default all the views will be picked from /templates directory |
Finally, update/create a new Spring App.
.SpringMVCDemoApp.java
  @SpringBootApplication
  public class SpringMVCDemoApp {

    public static void main(String[] args) {
      SpringApplication.run(SpringMVCDemoApp.class, args);
    }
  }
That’s it!
Starting Server
Open the SpringMVCDemoApp.java and move the mouse pointer to the line where you have your main() method, it will say Run …App, click and it will start a spring boot server.
Check the previous post on Starting Server.
Launch App In Browser
Open a browser and enter https://localhost:8080/ this will show the contents from index.html our default landing page.
Click on the hyperlink as here, this will render Details Views HTML.
Enter the full name and click the submit button and you will be seeing the Welcome message :).
Source Code
You can either git fork, git clone or download this repository spring-mvc-app.